
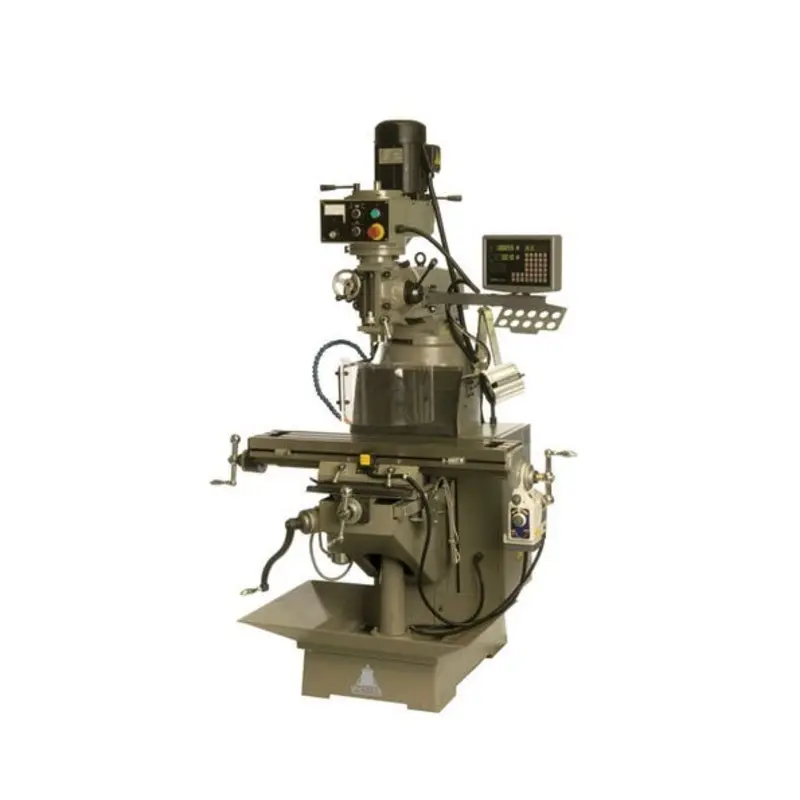
Description
Chester UK 836 Metric Turret Milling Machine – 3 Phase – 415v Product Description
The Chester UK 836 Metric Turret Milling Machine – 3 Phase – 415v is a high-quality, highly accurate milling machine that is designed for precision work.
As a result, this universal milling machine from Chester Machine Tools, comes with a compact, space-saving design, which makes this vertical milling machine ideal for both professional machine shops and hobby engineers.
Its rigid cast iron construction will also give you very long-lasting performance as well, making it a reliable tool for demanding milling tasks as a result.
High Precision and Performance
Built for accuracy, the 836 Turret Mill has the inclusion of X-Axis Powerfeed, along with featuring a 3-axis DRO (Axis Digital Read Out) to provide you with some very precise measurements suitable for the demands of precision milling tasks.
Its fine feed system also gives this manual milling machine a smooth and controlled cutting ability, which makes it ideal for machining turbine blades, surgical instruments, and other precision manufacturing components with ease.
Variable Speed and Power Supply
With a wide range of spindle speeds, this milling machine adapts to various cutting tasks quickly.
This manual lathe’s powerful 3-phase, 415V electric motor also gives you a very efficient operation, while the variable speed control allows for a lot f flexibility for different materials and cutting tool applications as it does so.
Rigid and Durable Construction
Manufactured from high-quality materials, this machine gives you a rigid cast iron construction, which is ideal for superior stability and durability, with a good low net weight as well.
As a result, its top-quality casting also helps to give you a vibration-free operation, improving the quality and accuracy of your machining parts work in the process.
Enhanced Functionality
Designed for various uses, the Chester UK 836 Turret Mill includes an X-Axis Powerfeed, automating the longitudinal movement of the workpiece for greater efficiency as well.
Its one-shot lubrication system also helps to give you a smooth operation and reduces its maintenance requirements too.
Supplied Accessories
This milling machine comes equipped with essential accessories, including:
- Clamp Kits Secure your workpieces easily
- Collet Chuck Sets Compatible with various cutting tools
- Face Plate Ideal for face milling applications
- Jaw Chuck For secure and precise work holding
- Coolant System Helps maintain cutting tool temperature
Compatable
For those looking for an ideal machine for their workshop, the Chester UK 836 Mill is a perfect choice. It is compatible with a range of additional tools and spare parts, including
- End Mill Sets
- Angle Plates
- Arbor Sets
- Micrometer Sets
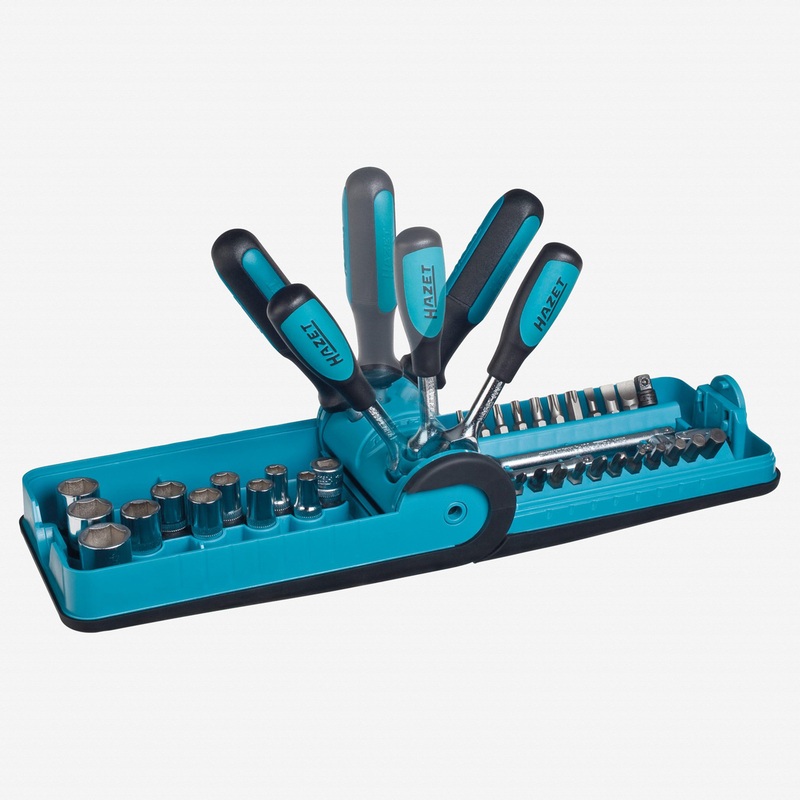
What Comes in the Shipping Container with This Product?
In the shipping container for this product, you will get the following items:
- Flat Way Cover (rear)
- Accordion Way Cover (front)
- Knee Crank
- Drawbar
- Tool Box:
- Hex Wrench Set (1.5 – 10mm)
- 17/19mm Combination Wrench
- #2 Cross Point Screw Driver
- #2 Flat Blade Screw Driver
- Oil Can
- Hand wheel
- Adjustable Wrench
- Handles for Handwheels (5)
- Operator’s Manual
What Controls Does This Machine Have?
This milling machine has lots of controls, including for instance:
Belt Cover Lock Knobs (A, Fig. 4)
It is located on the right side of the head. Loosen and remove the belt cover to change the belt position on the pulleys.
Spindle Brake (B, Fig. 4)
It is located on the left side of the head. Move-in either direction to stop the spindle once the power has been turned off.
Quill Feed Handle (C, Fig. 4)
It is located on the right side of the head. Rotate counter-clockwise to lower spindle. The return spring will retract the spindle automatically once the handle is released.
Quill Lock (D, Fig. 5)
It is located on the right side of the head. Rotate the handle clockwise to lock the quill in the desired position. Rotate the handle counter-clockwise to release.
Micrometer Adjusting Nut (E, Fig. 4)
It is located on the front of the head. Used for setting specific spindle depth.
Manual Fine Feed (F, Fig. 4)
It is located on the left side of the head. Must engage fine feed (I, Fig. 5) for the hand wheel to function.
Quill Stop (G, Fig. 4)
This is located on the front of the head. Used in conjunction with a micrometre fine adjusting nut for a predetermined depth.
Reversing Switch (H, Fig. 5)
It is located on the left side of the head. Switches rotation of the spindle. For 3 Ph motor, there is an additional low and high-speed option.
Fine Feed Engagement (I, Fig. 5)
It is located on the left side of the head. Turn clockwise until tight. This engages the manual fine feed.
Longitudinal Movement (J, Fig. 6)
Handles located on opposite ends of the table. This controls the X-axis.
Cross Movement (K, Fig. 6)
Handle located directly in front of the machine. This controls the Y-axis.
Knee Handle (L, Fig. 6)
This raises the table up and down.
How Do You Change its Speeds?
- Unscrew two knobs (A, Fig. 4) and remove the belt cover.
- Loosen hex nut (A, Fig. 7).
- Take the tension off the belt by moving the handle (B, Fig. 7).
- Use the RPM chart to place the belt in the desired position.
- Place tension on the belt by moving the handle.
- Tighten hex nut.
- Always replace the belt cover!
Installation layout
How Do You Position the RAM?
CAUTION!
Care should be taken to lock the RAM securely after setting.
Ram can be moved by loosening two handles (A, Fig. 8), and turning handle (B, Fig. 8) to the desired position.
Note: It is recommended that during heavy milling work, the head should be left as close to the face of the turret as possible to achieve maximum rigidity.
How Do You Make Adjustments to It?
Knee Gib Adjustment
(#53) Adjust the gib screw (#18) below the wiper on the left side of the knee for proper travel and to reduce excess play.
Note: When adjusting the gibs, always start with the knee. Adjust the saddle second, and adjust the table last.
Saddle Gib Adjustment
(#47) Adjust gib screw (#18) found on the right side front of the carriage for proper travel and excess play.
Table Gib Adjustment
(#45) Adjust gib screw (#18) found on the left side of the table toward the front of the carriage for proper travel and excess play.
Ram Wear Plate
(#10) Adjust two set screws (#19) found on the side of the ram for proper travel.
Head Alignment
The scales on the ram adapter and head rotation are guides only. Close tolerance work will require the use of a dial indicator to ensure the head is 90 to the table in the X-axis.
Longitudinal & Cross Feed Adjustment
If there is excessive backlash in the handle:
- Loosen hex socket head screw (#27).
- Turn feed screw nut (#26 or 29) to remove play.
- Tighten hex socket head screw.
Head Assembly
For your head assembly, you have:
How to Prepare The Site For This Mill?
CAUTION!
The Mill must be supported equally under all four corners. Failure to comply may cause the column to twist and put a bind in the bedways.
The mill must be placed on an even surface and bolted to the floor. Anchor bolts of sufficient size and length must be fastened to the floor according to the footprint of the mill.
How to Lubricate This Machine?
CAUTION!
Do not operate the mill before lubricating the machine fully. Failure to comply may cause damage to the machine.
Reference Fig. 3 for parts of the mill to lubricate:
A. Spindle Bearings – fill oil cup once daily with Mobil DTE Oil Light.
B. Oil Pump – Fill the reservoir as needed by removing the cap on top of the tank and filling it with Mobil Vactra Oil No. 2. Pump oil with the release handle once for every hour of operation. Way surfaces and lead screws are lubricated in this manner.
C. Knee Leadscrew – lubricate with Mobilith AW2 once a week.
Electrical Connections
WARNING! All electrical connections must be made by a qualified electrician! Failure to comply may cause serious injury!
Confirm that the power at the site matches the power requirements of the mill before connecting to the power source.
The mill must be properly grounded.
How Do You Lift This Mill?
WARNING
Keep people a safe distance away from the milling machine while it is being moved. Failure to comply may cause serious injury!
Lift the mill with appropriate-sized lifting straps. Follow the diagram in Fig. 2 for the proper position of the straps under the ram.
Note the position of the RAM and that the table has been moved against the column. Tighten the ram locking bolts (A, Fig. 2) before lifting.
Carefully lift the mill. Move into position over the anchor bolts. Lower the mill onto the anchor bolts. Check for level and secure with washers and anchor bolt nuts.
Check the mill for level with a machinist’s level placed on the table. The mill must be level back-to-front and side-to-side. Shim if necessary, but remember that the mill must be supported equally at all four corners. Check for level before tightening the anchor bolt nuts and after tightening them. Adjust as necessary.
How Do You Raise The Mill’s Head?
Remove handwheel (A, Fig. 1).
Loosen four cap nuts (B, Fig. 1) turn to unlock the head. Do not remove these nuts unless you are prepared to remove the head.
Use a 19mm socket and breaker bar on the adjusting nut (C, Fig. 1) to rotate the head.
Instructions on how to Unpack and Clean up
Finish removing the sides and top of the crate.
Leave the mill bolted to the skid until it is ready to be moved to its final location.
Clean all rust-protected surfaces with kerosene or a light solvent. Do not use gasoline, paint thinner, or lacquer thinner. These will damage painted surfaces.
Cover all machined surfaces with a film of light machine tool oil to inhibit rust.
Remove the wood block from below the knee.
Upper Head Assembly
For this machine’s upper head assembly, you have, for instance:
Parts List
This milling machine comes with the following parts:
| Index No. | Part No. | Description | Size | Qty. |
|---|---|---|---|---|
| 1 | JVM836-01 | Castle Nut | M12 | 1 |
| 2 | JVM836-02 | Lock Nut | 1 | |
| 3 | TS-1523041 | Hex Socket Cap Screw | M6x12 | 3 |
| 4 | JVM836-04 | Cover | 1 | |
| 5 | JVM836-05 | Taper Sleeve | 1 | |
| 6 | JVM836-06 | Spring | 1 | |
| 7 | JVM836-07 | Transmission Sleeve | 1 | |
| 8 | JVM836-08T | Worm Gear (serial # 0040050 and higher) | 1 | |
| 9 | JVM836-09 | Spring Washer | M4 | 3 |
| 10 | JVM836-10 | Cross Round Head Screw | M4x16 | 3 |
| 14 | JVM836-14T | Shaft (serial # 0040050 and higher) | 1 | |
| 15 | JVM836-15 | Key | 5x5x20 | 1 |
| 16 | JVM836-16 | Cross Flat Head Screw | M5x6 | 1 |
| 17 | JVM836-17 | Whitney Key | 1 | |
| 18 | JVM836-18T | Volume Spring (serial # 0040050 and higher) | 1 | |
| 19 | JVM836-19 | Spring Bracket | 1 | |
| 20 | JVM836-20 | Full Dog Point Set Screw | M8x8 | 1 |
| 21 | TS-1514021 | Hex Socket Cap Screw | M6x15 | 4 |
| 22 | JVM836-23 | Transmission Sleeve | 1 | |
| 24 | TS-1523031 | Set Screw | M6x6 | 1 |
| 25 | JVM836-25 | Round Pin | 1 | |
| 26 | JVM836-26T | Handle Base (serial # 0040050 and higher) | 1 | |
| 27 | JVM836-26TA | New Handle Assembly (Include: #26,30,31) | 1 | |
| 28 | JVM836-27 | Steel Ball | 6 | 1 |
| 29 | JVM836-28 | Spring | 1 | |
| 30 | TS-1524011 | Set Screw | M8x8 | 1 |
Why Choose the Chester UK 836 Turret Mill?
This machine is designed to meet the highest standards of milling precision. With its compact design, robust construction, and essential features like the X-Axis Powerfeed and 3-axis DRO, it is an excellent choice for both professional use and hobby engineers.
Order now and enjoy free delivery as well.
Alternatively, please feel free to contact us today for more detailed information on this new the Chester UK 836 Metric Turret Milling Machine – 3 Phase – 415v.
Who Is MSC Industrial Supply Co.?
Here at MSC Industrial Supply Co., we are a leading supplier of industrial machine tools, equipment, and maintenance supplies across the United Kingdom. As a result, we can offer trade accounts, a vast selection of new and great-value products from tool sets to metalworking cutting tools and lots more, with free next-day delivery on eligible orders as well.
Our extensive range includes everything from hand tools and power tools to specialised hole-making equipment like blacksmith drill bits, core drills, and machine reamers, to name just a few.
As a result, we can provide you with a comprehensive selection of products, including:
- Blacksmith Drill Bits
- Countersink Drill Bits
- Step Drill Bits
- Masonry Drill Bits
- Hand Tools
- Indexable Insert Drills
- Cutting Tools
- Abrasives
- Power Tools
- Reamer Tools
- Safety Equipment
- Centre Drill Bits
- Fly Cutters
- Turning Inserts & Tools
- Lathe Tools, Turning Inserts & Tools
As a result, we serve a wide range of industries, from manufacturing and engineering to maintenance and beyond. Consequently, our commitment to providing high-quality products and exceptional customer service makes us a trusted partner for all your industrial needs.
With our knowledgeable customer support team and technical assistance available Mon-Fri, we ensure you have the support you need to succeed.
Reviews
There are no reviews yet.